")
")

Embellishing Zinc Surfaces
All cast zinc lamps were originally either galvanically "bronzed", i.e. the bare zinc surface was covered with a thin layer of brass using the electroplating technique (see Metals at Infoboxes), or lacquered with a suitable patina or bronze paint. This metal or lacquer coating protected the zinc surface from tarnishing, which would otherwise form an unsightly, dull, greyish-white surface that could not be removed with the usual cleaning agents. However, this galvanic coating was usually quite thin and could not withstand decades of cleaning, brushing and rubbing. Therefore, most of the cast zinc lamps are heavily rubbed; their bronzing has usually been lost over a large area and needs to be renewed.
I described the cleaning of such surfaces in the previous chapter. Now we come to the actual topic: What are the possibilities of restoring the unsightly cast zinc lamps to a beautiful appearance?
A remedy often used is to spray the entire surface with a brass spray or to repaint it with appropriate lacquers. The result is an absolutely evenly coloured metal all around with a silky shiny surface, without any distinction of raised and recessed areas. I confess, I don't like this look at all. You can tell immediately that old castings have been recoloured with a spray. The result is certainly pretty close to freshly galvanised lamps, as if they have just left the factory. But these lamps have a history of 100-150 years; have been through a lot, survived wars and destruction, damp cellars and dusty attics, and should now appear as if freshly made? I am not convinced by the immaculate appearance of a freshly sprayed or painted lamp.
Another procedure, which I often used in the beginning, is a kind of "total operation". You remove all remnants of a coloured paint, you sand off all traces of old galvanic coatings that are still visible. The zinc surface exposed in this way is then cleaned, finely ground and polished. The result is a quasi-newly produced, silvery, colourless cast zinc lamp that even looks attractive and retains its beautiful shine for several months. But this appearance does not correspond at all to the original lamp and is therefore not acceptable.
It therefore seems to me to be very advantageous if the zinc cast surface shows a clean, fresh, not damaged or dull and darkly tarnished bronze colour uniformly in all elevations, but remains quite dark in the depressions. This results - with some imagination - in an appearance of heavily tarnished brass, but then polished bright again at the elevations. I must emphasise once again here: The aim is not to create a brass-like surface and thus to deceive the viewer, but to achieve a surface that appears vivid through light-dark effects, because the cast zinc lamps live precisely from this effect of their heavily structured surfaces.
My Previously Used Method for Bronzing
Following a suggestion from my friend Ara, I first used the following method: After thoroughly cleaning (and repairing if necessary) the cast zinc parts, I first painted them all over with a good bronze lacquer. There are bronze lacquers in liquid form from the French manufacturer Lefranc & Bourgeois (available from Boesner GmbH) in many different shades (several shades of gold, copper, silver and pewter). There are certainly other brands that are just as good to use; however, I have had good experiences with this brand and have stuck with it.
After the lacquer coat had dried thoroughly, I brushed this lacquered surface with a very dark shoe polish (mostly black, occasionally dark brown), taking great care to make sure that the indentations were covered and filled with this shoe polish. It has to be liquid shoe polish from the tubes, not the more solid shoe waxes. Why shoe polish? Before you shake your head in disbelief, please read on.
After a drying time of 10 or 15 minutes at the most, I rubbed all the raised areas of the surface with soft, absorbent paper (toilet paper is best) until the dark colour of the shoe polish only remained in the recessed areas. Now the advantages of shoe polish come to the fore: it can be wiped off even when it is fairly dry. If necessary, the paper can be moistened a little with kerosene/paraffin or white spirit, which easily dissolves the shoe polish layer.
This method has the advantage that the rubbed areas show a slightly shiny surface, because the shining ingredients of the shoe polish have their effect here.
However, this method has two disadvantages: If the zinc cast surface is covered with tiny holes (which is often the case with very old zinc cast lamps), remains of the shoe polish will remain in these holes despite all bright polishing and result in a somewhat darker, slightly dirty-looking appearance. This can sometimes be interesting; it sometimes bothered me.
The second disadvantage is serious in terms of work. One must not miss the right time for bright polishing! If you start wiping off the shoe polish too early, you will often get the dents that are still completely wet, with the result that the intended light-dark effect will be lost for the most part. If, on the other hand, you wait too long, the dried shoe polish cannot simply be wiped off. In this case, only kerosene/paraffin or white spirit (turpentine substitute) can help as a solvent. But even this has to be used with tact, otherwise the underlying layer of bronze lacquer will also be loosened. Because of this problem, the application and subsequent wiping away of the shoe polish must be done in portions, i.e. with small surfaces at a time.
Because of this annoying time factor, I looked for alternatives and developed my own method, which requires a reversal of the work steps.
My Current Method for Bronzing
Through long experimentation and trial and error, I have developed my own method for restoring pitiful zinc cast surfaces to an authentic, vibrant, shiny appearance. This method differs from the method described above in two serious ways. The first difference is the reversal of the steps: You first prime with shoe polish and then let it dry completely. Only then do you apply the bronze paint to the primed surface. The second difference is that the bronze paint is not applied as a liquid varnish but as a soft, brushable wax.
Priming: Once the cast zinc surface is clean and free of dust and encrustations, this surface must first be primed with a dark colour. To do this, I coat the entire surface with a mixture of dark brown, crimson and black shoe polish using a medium-thick brush. The mixing ratios are variable and depend on what colouring is desired for the deeper areas. I prefer about 2-3 parts dark brown, about 1 part black, and a little (about 0.5 parts) crimson; this - after thoroughly mixing the colours - results in quite a dark tint, resembling a heavily tarnished brass. Black and dark brown shoe polishes are available in drugstores and supermarkets. Dark red, better crimson (= Bordeaux red) shoe polish has to be ordered in stores.
When applying this shoe polish mixture, I make sure that deepened lines, dots or other, smaller surfaces that are not later covered by the gold wax and remain as dark areas are really thickly coated with shoe polish. The large, smooth, raised areas, on the other hand, do not need shoe polish per se, as they will be covered with gold wax later. But experience shows that priming these areas makes it quite easier to apply the gold wax later. Shoe polish dries slowly and gives a rather dark, matt tint. You have to let this primer dry thoroughly for at least 1-2 hours before you start the next step, the actual bronzing. I usually leave the pieces to dry overnight.
Bronzing: For the final bronzing of the surfaces that have been pre-treated with shoe polish, I use a special "gold wax". There are creamy waxes with gold and other shades (actually for finishing wooden picture frames) from the same French manufacturer (Lefranc & Bourgeois) in brass, gold, copper and silver shades. These waxes are also available from Boesner GmbH. The name "gold wax" should not mislead: These waxes do not contain real gold, but finely ground particles of corresponding metals. After many more or less unsuccessful attempts with different brass, gold and oil paints, I finally discovered these special waxes for bronzing metal surfaces.
I take a little (sometimes just a touch) of this wax on the fingertip of my little finger and rub it very gently on the surface that has been pre-treated with shoe polish, and lo and behold: the gold-coloured wax adheres wonderfully to this surface! As the finger is much wider than a fine brush, you can only touch and apply the colour to the really raised areas; the recessed areas are not touched by the finger at all and retain their dark colour of the primer. With skill and feeling, you can achieve fine transitions of gold tones on the dark background. Of course, this requires some experience, but this comes with time.
This wax layer now needs a few days to finally dry; only after a week of drying time does such a wax layer leave no visible traces on the fingers if you touch the treated areas vigorously. Afterwards, you can even polish the bronzed areas lightly with a soft cloth. Of course, you can apply more gold wax here and there if the eye so desires. Now the raised areas have a silky, shiny golden colour, while the depressions remain matt and dark. The result is a quite sculptured, vivid, visually very appealing look, which I personally like very much. The following series of pictures gives a nice example of my method.

Individual stages of bronzing according to my method
Top row, from left: Lamp part uncleaned, as received - Cleaned with steel wool and other mechanical aids - Primed with dark shoe polish
Bottom row, from left: Fingertip with gold wax - Application of gold wax - Final result
Fortunately, there are different shades of gold to choose from. From the very light "Or riche" to "Laiton" (= brass) and "Or classique" etc. to the quite dark "Or Florentine". To achieve pleasant, light copper tones, I mix waxes with copper and gold tones in different mixing ratios.

Different shades of gold on detail shots
Top row, from left: Or riche (= very light gold tone, L.102)
Laiton (= brass colour, L.152)
Or classique (= classic gold tone, L.246)
Bottom row, from left: Or classique (L.356)
Or Florentine (= Florentine gold tone, L.135)
Or Florentine (L.104)

Different shades of copper and pewter on detail shots
Top row, from left: Cuivre (= copper), approx. 3:2 mixed with Laiton (= brass, L.051)
Cuivre, approx. 1:1 mixed with Laiton (L.014)
Cuivre, approx. 1:2 mixed with Laiton (L.210)
Bottom row, from left: Cuivre + Laiton 1:2, additionally heightened with Laiton (L.153)
Bronzing with two tones: copper tone (Cuivre + Laiton 3:2) and Or classique (L.195)
Étain (= tin colour, L.353)
The great advantage of this method is that you are not working under time pressure. You can prime larger zinc castings, or even complete lamps, and leave them to dry. You can start bronzing when you have time (after hours or days). The disadvantage is the slow drying of the wax layer. Although you can touch a finished bronzed surface after a quarter of an hour, some shiny golden pigment particles still stick to your fingers. The wax layer is only really dry after 1-2 weeks. Another disadvantage is the relative sensitivity of the surface. A "bronzing" applied with this method is certainly much more sensitive than any other metallic coating or lacquer. Abrasive cleaning agents such as scouring milk or polishing agents would completely rub off the gold wax layer again. Therefore, it would be advisable to provide these bronzed surfaces with a suitable, invisible protective varnish. Certain non-glossy varnishes (e.g. for pastel paintings) would probably be suitable. However, I have not tested them yet and therefore cannot recommend them. My earliest bronzes with this method (more than 5 years old) still show no tendency to tarnish.
To demonstrate the results this method is capable of, I would like to present some of my cast zinc lamps in "before and after" photos. The first photo in each case shows the lamp in its original found condition. The second photo is the result after my cleaning, repair, priming and bronzing.

Left: Completely "weathered" lamp - Cleaned in NaOH bath and bronzed with Laiton (L.272)
Right: Lamp cleaned to zinc surface - Bronzed with Or classique (L.246)

Left: Completely soiled lamp - After thorough cleaning and repair bronzed with Laiton (L.362)
Right: Completely tarnished and dirty lamp - After thorough cleaning bronzed with Laiton; background painted with a mixture of shoe polish and gold wax (L.331)

Left: Completely filthy and partially rusted lamp - Cast iron lamp body bronzed with a mixture of Laiton + Or classique; brass font cleaned and polished (L.309)
Right: Black painted figure, paint dirty and sticky - After extensive repair bronzed with a mixture of Laiton + Or classique (L.311)

Left: Figural lamp completely sprayed dark brown - After cleaning and repair bronzed in two colours: Skin parts with Or classique, clothing and ornamental parts with a mixture of Cuivre + Laiton (L.195)
Right: Two-coloured patinated figure lamp, paint damaged and dirty - After extensive repair bronzed in two colours: Skin parts and flower on the dress with Laiton, clothing and remaining parts with Or Florentine (L.216)

Left: Uniformly dark lacquered lamp, paint gummed-sticky - After cleaning with soda-water bronzed with Or classique; vase lacquered with black patina paint (Patine du Faubourg) (L.150)
Right: Completely rubbed and darkly tarnished lamp - Whole lamp lacquered with black Faubourg patina and certain parts bronzed with Or classique (L.158)

Left: Completely rubbed and dirty lamp - Lamp vase painted with dark green Revell paint and black Faubourg patina, bronzing with Laiton (L.295)
Right: Zinc castings completely rubbed, black lacquer on the vase partly dull - Vase painted with black Revell paint and polished, zinc castings bronzed with Or Florentine (L.104)
Silver Plating of Copper and Brass Surfaces
There are rare cases where silver-plating of copper or brass surfaces will be necessary to give the lamp a harmonious appearance. Such a case occurs, for example, when the metal parts of a lamp are silver-plated, but the burner you intend to use for this lamp is unfortunately not. A burner with the normal brass colour on an otherwise silver-plated lamp does not look too dignified. A similar case is when you want to put a new glass font on a silver-plated lamp, but its font collar and brass undermount are not silver-plated. A globe holder or shade holder in brass colour in combination with a silver-plated (or nickel-plated) burner also calls for a better solution. Sometimes it happens that the silver layer of an originally silver-plated lamp is worn off in places. Of course, globe holders or shade holders can be painted with a silver or chrome coloured spray. This is not possible with the burners because of the irreversible bonding of all moving parts.
In such and similar cases, I have silver-plated these brass or copper surfaces myself with a silver solution. The product is called Silver Plate Solution by Sheffco (available on the Internet). If you follow the instructions exactly, you can apply a very thin layer of silver with this solution, which you can also polish afterwards with a soft cloth. The result is of course not identical with a professional, galvanically applied silver plating; but at least it works satisfactorily in that the visually disturbing brass and copper colours disappear under a layer of silver. In any case, it is important to clean the parts to be silver-plated properly beforehand, because the silver solution will only adhere to brass or copper surfaces that have been thoroughly cleaned and polished bright with fine steel wool. Tin, zinc or lead surfaces do not accept the silver coating. Needless to say, silver-plated surfaces of this kind must not be cleaned with silver polishing agents (e.g. Mellerud® polishing paste) if they have become tarnished over time. Any polishing paste would rub off the wafer-thin silver layer. It is better to apply the silver solution again.
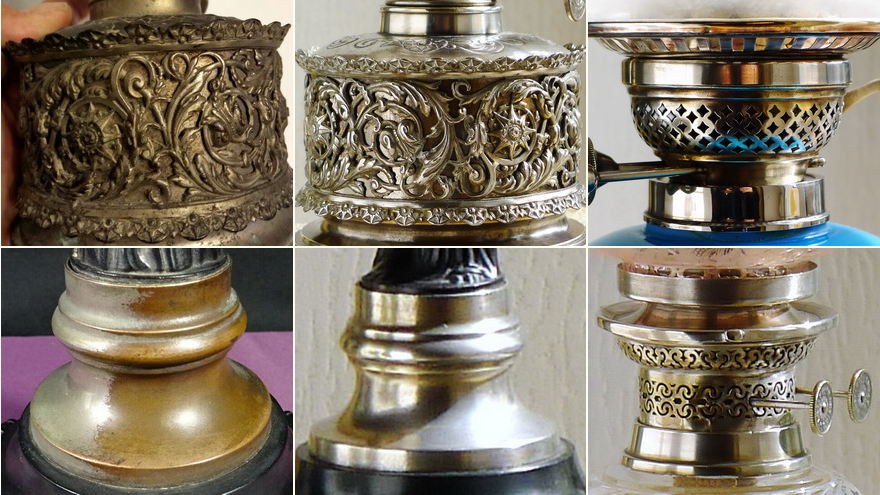
In the next photos I show some silver platings with Silver Plate Solution. On some parts the silver solution worked better, on others less well.

Upper row, from left: A copper lamp with burner and globe holder before and after silver plating (L.003)
A former silver-plated lamp with brass burner before and after silver-plating (L.294)
Bottom row, from left: Brass shade holder and burner after silver plating (lamp is original silver plated; L.307)
Another brass shade holder after silver plating (burner and font collar are original nickel plated; L.353)
Upper row, from left: A formerly nickel-plated lamp before and after silvering (base and font wall are not silver-plated; L.327)
A duplex brass burner and globe holder after silver plating (collar and rest of lamp are original silver plated; L.279)
Bottom row, from left: A formerly nickel-plated connector before and after silver-plating (L.174)
A formerly silver-plated Martin burner with heavily damaged silver layer after silvering (L.032)