")
")

Creation of the Photos
I am not a professional photographer. However, I have the ambition to photograph the lamps in my collection so well that their beauty, their form, their design is reproduced as well as possible. However, this can only be achieved in a professional photo studio. Transporting 365 lamps individually to a studio and having them photographed by professionals? An impossible (and also hardly affordable) undertaking. So I had to take on this challenge and photograph the lamps myself.
For years I have photographed the lamps, as soon as they are renovated and completed, in front of our patio door at the corner. This is the only place in the house where good daylight, preferably sunlight, shines on the lamp from the side and I have enough space to take the photo from at least 2-3 metres away. I think the daylight is quite optimal to bring out the colourful beauty of the lamps. Especially when sunlight shines through the coloured glass parts of the lamp, the colours are vivid and rich in contrast. However, daylight also has "shadow sides": Depending on the time of day, the cloud cover, the position of the sun in the sky, there are very different lighting effects. For example, on a cloudy day you get a "cold, very white" light with up to 7500 Kelvin; whereas the colour temperature of morning or evening sunlight is only 5000 Kelvin, i.e. it appears "warmer". For comparison: warm white LED lights have 3300 K, halogen lights 2800 K, early incandescent lamps (the usual light bulbs) 2700 K and candlelight 1200 K (source: Wikipedia).
The same lamp photographed on a winter's day with an overcast sky appears completely different from the one photographed on a sunny day late in the afternoon with the sun relatively low in the sky. It is possible to compensate for the colour differences between these two photographs to a certain extent with an image processing programme, but a non-negligible difference remains. At least I have always integrated these daylight photos of the lamps in the detail photos.
For the "studio-like" photos, I had to use artificial light. In a room that is completely shielded from daylight, you can take photos in the same artificial light that best meet the documentary requirement. For this purpose, I converted our large garden shed into a private photo studio. I covered the windows and doors with black cardboard so that no daylight could get in.
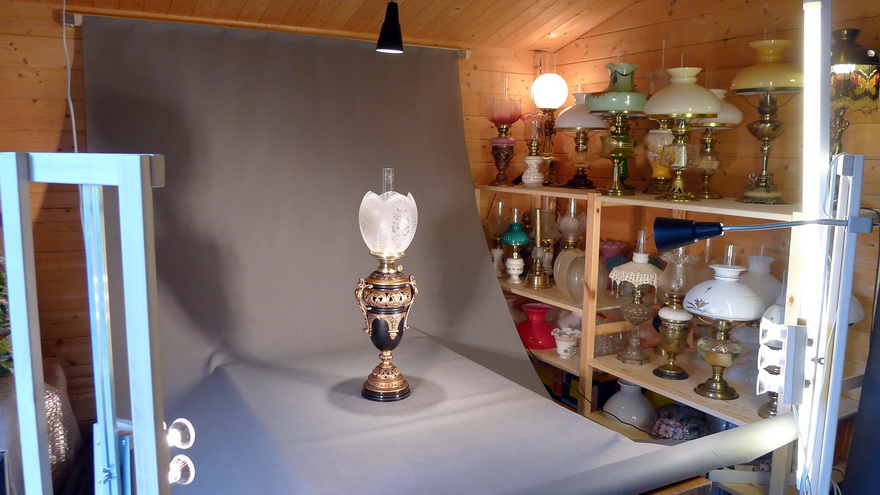
My "photo studio" in our garden house (in the back, some of the out-sourced lamps)
The flash light of the camera was completely unsuitable due to the very hard shadow formation directly behind the lamps. A purchased photo studio set consisting of two LED lights (5000 K, cold white) with large reflectors also proved unsuitable due to the rather cold, bluish light effect, which I just don't like.
My eyes rather wanted a "warmer" light. I had plenty of 35 W halogen spots available. So I constructed two light sources, one with 6 and one with 4 such halogen spots connected together and fixed them in two wooden constructions (self-made) so that they could be adjusted in height. An LED spot (warm white) at the top of the ceiling provides effective lighting for the tulip shades and globe shades directly from above. A vertically mounted long light tube ensures that the glass chimneys of the lamps are at least visible with vertical light reflections in the photos.
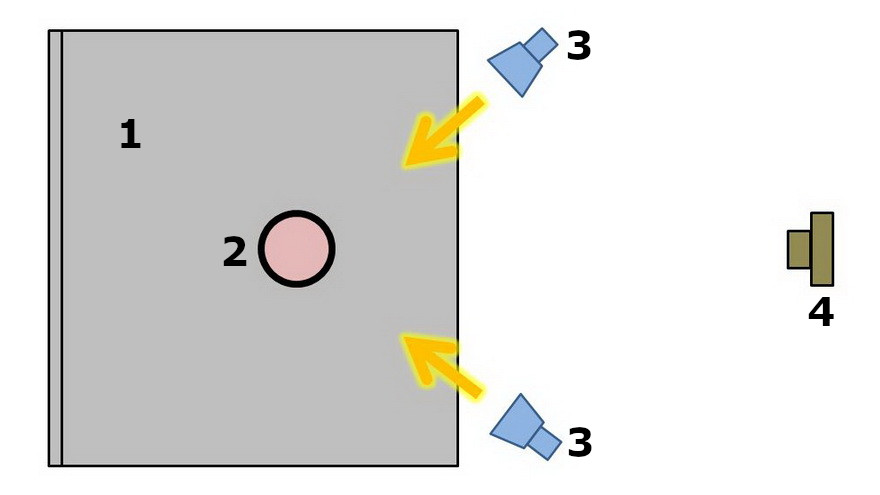
Schematic representation of my "photo studio" (seen from above)
1 = Background with neutral colour
2 = Lamp to be photographed
3 = Light spots
4 = Camera
All large lamp photos as single shots with artificial light were taken this way with a Nikon D5200 (SLR camera). All lamp details in collective photos are mainly taken in daylight with a Panasonic Lumix LX5 (smaller digital camera with moderate zoom).
Group Photos (Collective Photos)
I first presented my lamps in their respective countries of origin in group photos of 5-9 lamps together to give a first visualisation. Only when the lamps with comparable characteristics are photographed together do you get a sense of their size and common attributes.
These group photos (I call them also collective photos) should be in 16:9 format according to our format specification already established at the beginning of the work on the website. In fact, all the photos in this website are in 16:9 format except for the photos of burner logos, which are cropped square, the two photos with the variety of glass chimneys from a German catalogue and the two "Polaroid"-like photos at the beginning and end of the website.
However, I could not take the group photos of the lamps in 16:9 format, because the neutral grey background in my garden house photo studio did not have the necessary width for this. Of necessity, I merged these group photos from two separate photos into a uniform 16:9 format. With very few exceptions, these group photos consist of two shots separated from each other by a thin dividing line.
At the beginning of the work, however, I had foolishly not thought of always cutting the respective photo halves in the same size ratio. It only occurred to me later. Therefore, the proportions of the lamps in the left and right photos are not always comparable. This primarily affects the group photos for the German lamps and also occasionally for the French lamps.
The detailed photos in the individual fact sheets are also collages of several photos. The overall format, however, is always 16:9. The photo of the lamp in daylight is always placed on the left, followed by detailed photos of important parts of the lamp. The wick knob logo of the burner is always shown at the top right, and the brand of the glass chimney (if the glass had a brand) is always shown at the bottom right.
The photos in the website cannot be enlarged; they are shown in their final size (exception: Catalogue of the Lamps). Only when viewing the website on a very small monitor (e.g. from smartphones or from small tablets) will it happen that the photos are automatically displayed in a reduced size on such monitors. In this case, you can enlarge the photos to their original size (two-finger operation on touchscreens).
Tips for Taking Photos
It is frightening how clueless some people are when it comes to photographing their lamps and then uploading these photos to sales portals. In most cases, the camera (nowadays probably the smartphone) is held at close range at an angle to the lamp from above and the photo is taken. This results in photos in which the lamps appear "top-heavy", i.e. the upper part of the lamp (occasionally with a shade, if existing) appears to be far larger than the lower part of the lamp. You don't get a feel for the real proportions of the lamp at all.

Two shooting angles and their results in real photos of the same lamp
Left: Shot diagonally from above (distance 0.5 m)
Right: Shot horizontally, camera approximately in the middle of the lamp (at same distance)
Good photos have their value. They document the lamps (or any other objects you want to sell or document for yourself) without distortions in correct proportions. I recommend keeping the following points in mind:
1) Place the object in front of a background that is as neutral as possible, very restrained in colour and not overloaded with decoration. A neutral wall with a light colour without patterns would be optimal. The object itself must attract all eyes as the main element of the photo and not bookcases, flowers and plants and the like in the background. A bright window in the background is the worst thing you can choose. The camera will get a good shot of the window and the lamp in front of it will appear far too dark.
2) Make sure that good daylight falls on the subject either from the side or even frontally. If you have to shoot with artificial light because there is no daylight available where you want to shoot, then please do not use a flash, but simply a normal light source (some table lamp, spotlight, or similar), which you place at some distance (1-2 m) to the side. This way, relatively soft light falls on the lamp and you don't get any disturbing shadows.
3) If you have a camera or smartphone with a zoom function, it is best to take photos at a distance from the object, about 2-3 m away, while still zooming in on the object to fill the frame. This approach is advantageous for achieving natural-looking photos. It is not for nothing that good studios only take portraits with a zoom from some distance away. If you were to photograph a face from a short distance (e.g. 1 m), then middle parts of the face, e.g. the nose, would appear thicker and larger, which is certainly not advantageous. The same applies to lamps and other objects.
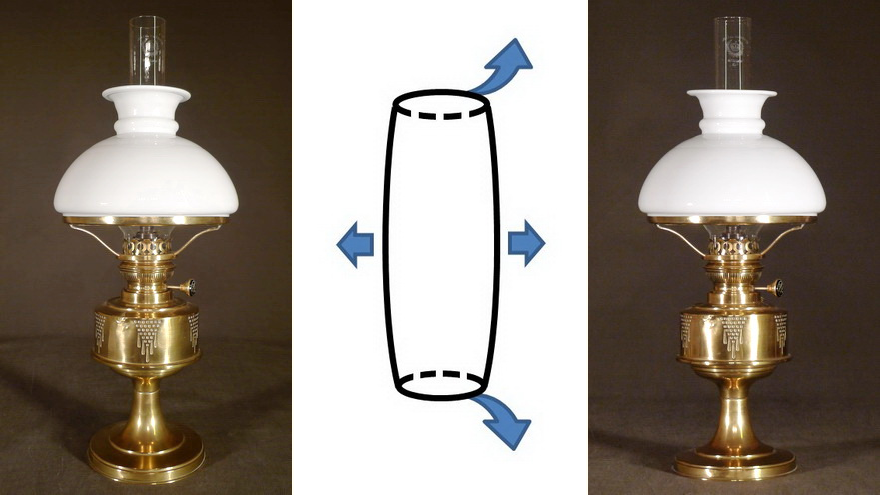
The effect of the distance between camera and object
Left: Photo taken from a distance of 0.5 m; lamp distorted (“barrel curvature”)
Middle: Schematic effect of "barrel curvature" on a cylindrical body at a short shooting distance: upper surface tilts upwards; lower surface tilts downwards; the cylinder appears "thicker" in the middle
Right: Photo taken from a distance of 2 m; lamp in natural appearance
4) Make sure you hold the camera at the middle height of the object to be photographed, and not above or even below the centre of the lamp. This will ensure that the real proportions of the lamp are reproduced very well. Otherwise you distort the proportions; the documentary character of the shot is lost.
5) The larger (i.e. higher) the lamp is, the greater the distance between camera and lamp is needed to get reasonably natural-looking photos. This is of course quite a problem with floor lamps, tall column lamps, large hanging lamps, because you can't keep a distance of 4-6 m in normal flats. My photos were taken by placing the pendant and floor lamps in front of a neutral white background in our garden with a good distance to them.
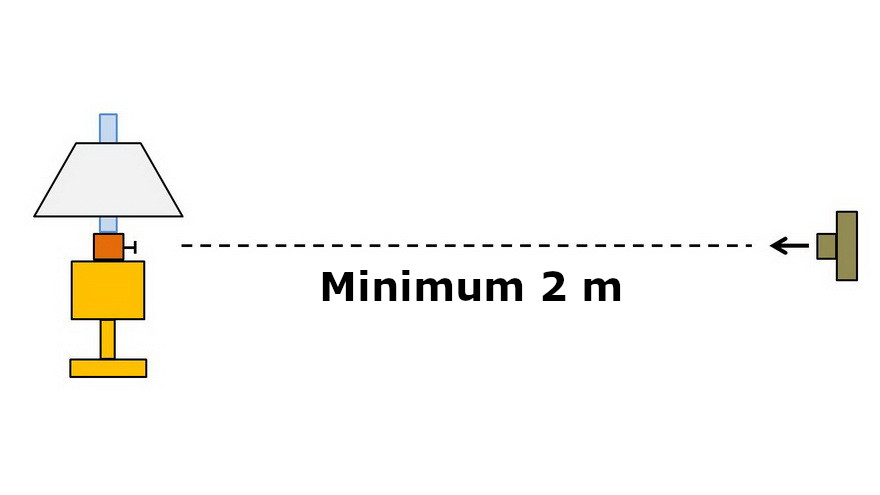
Schematic representation of good photo recordings
(Camera approx. at the height of the centre of the lamp and at a distance of at least 2 m)