")
")

Smoothing Small, Broken Glass Parts
Glass is a very difficult material for the layman to repair. Only proper glassblowers can make real and lasting repairs to glass parts. Therefore, it is absolutely advisable to look for a good glassblower at an early stage. One of the few repair jobs I have personally been able to do on glass is the mechanical smoothing of break-rough glass edges.
Sometimes you get a glass tulip or glass ball whose fitter has small and large fractures (so-called "chips" in English). It is possible to grind off these chips, especially if the edges are dangerously sharp and there is a risk of injury. To do this, simply insert a suitable grinding attachment made of corundum (= aluminium oxide) into the hand drill and slowly grind the glass edge to be ground, carefully, without great pressure, and always setting it down so that the glass does not heat up excessively. It is obvious that this does not produce a very flat, almost polished-looking surface, because the smallest pieces of glass keep splintering off during grinding. But this is not a problem, because the fitter of a shade is hidden in the shade holder or globe holder.
If the chips mentioned above are on the upper or lower edge of a glass chimney made of thin glass, I advise against using coarse corundum. The risk of cracking the glass is far too great. It is much better to use metal grinding wheels with incorporated pieces of corundum and to grind the broken area over a wide area until a reasonably acceptable edge is obtained. Such discs for grinding glass are available on the Internet. Sometimes even (otherwise very expensive) tulip shades are offered quite cheaply because they have such chips on their upper edge. It then depends on your quality standards whether you like to use such shades on your lamps. Even after the most careful sanding, the chip area is still visible as a now matt sanded surface.
Gluing Broken Glass
One work that can be done is, of course, gluing together broken pieces of glass, provided the breakage has been done smoothly, without splinters, etc. Any commercially available glue suitable for glass can be taken if it is colourless and transparent when dry. I have had good experiences with the classic Uhu® of Germany. Superglue can also be used, but only for smaller areas, because the glue dries very quickly and does not allow for later correction. If the break is quite large, I advise against superglues; by the time you have applied glue to the entire edge to be glued, it is already solid. Uhu® and similar glues, however, allow enough time to orientate the parts exactly and precisely to each other, so that the broken edge is hardly noticeable later (unfortunately, it will still be clearly visible). Do not wipe off the glue residue that has come out when pressing the parts together when they are wet, otherwise you will spread it over a large area of the glass surface. Let the glue dry very well (preferably overnight) so that even thicker glue residues are thoroughly dried and firm. Now you can scrape them off the surface very cleanly and without residue using a razor blade. A broken, rare shade can still be saved in this way and used further. Glass chimneys are unsuitable for gluing; they become much too hot when the lamp is burning and the glue turns noticeably yellow or burns to a brownish black line.
Sealing Leaking Kerosene/Paraffin Tanks
Sometimes you get a kerosene/paraffin lamp whose font is leaking. The tanks made of sheet metal may crack over time; the glass fonts may be cracked. Sealing the existing cracks or even holes in metal tanks can be done by soldering from the outside. With iron and brass sheet this is not a big job. With sheet zinc (in rare cases, old lamps have tanks made of sheet zinc), however, care must be taken when soldering (see Working on Metal Parts).
If, on the other hand, a glass tank is cracked and therefore leaking, you must seal this tank from the inside with a suitable two-component epoxy resin. It depends on where the crack is located in the glass. If the crack is at the bottom, a small amount of epoxy is sufficient to cover the entire bottom 3-4 mm thick. If the crack is on the side of the wall and relatively small in size, you can let the liquid epoxy resin solidify at this point by tilting the tank so that the cracked area comes to rest at the bottom, where the liquid resin then collects and solidifies. If, on the other hand, the crack is large or rather long, you have to distribute the resin evenly over the entire inner wall by pouring a much larger quantity of resin into the tank, tipping the tank back over to the side and now ensuring even wetting and distribution of the resin by continuously, steadily but slowly turning it in the same direction until it solidifies and stops flowing. Unfortunately, this is a game of patience, as it can take up to a whole hour to set (depending on the mixing ratio of the two components). Needless to say, the inner surface of the glass must be carefully cleaned and dried before applying the epoxy. I used the products SKresin V6 and Epohard 35 from the company S. und K. Hock GmbH for this purpose, as a good collector friend found this product to be the most suitable through repeated trial and error and recommended it to me. The product can be ordered on the Internet.
Painting Glass and Porcelain
Here I will present another work that can also be counted as repair: Painting on glass or porcelain surfaces. Not, as one might immediately think, to repaint an unpainted surface (that can be done; artistic development is always creative, if one is good at it), but to restore faded, damaged paintings. The word "restore" is perhaps too grandiose. We are certainly not skilled restorers. But a small chipped area of an enamel painting can be completed with the carefully matched glass colour; a golden trim line smudged by vigorous cleaning can possibly be traced well. But here, caution must be exercised: It often misses the mark if you are not skilled at painting. It is better to leave a faded, smudged line as it is than to make it even worse with a thick line done with a shaky hand. Here, too, it is worth practising diligently before you lay your hands on the lamp! Glass paints are available in hobby shops. In the next photo I show two examples of golden ornaments that I have "restored" using liquid brass paint.

Overpainted golden ornamental decoration on two porcelain lamps
(in each case before and after painting)
Ceramic Repairs
This material (all ceramic types including porcelain) is also difficult for us laymen to repair. Repair work on old, valuable ceramics should be left to experts. Chipped parts of the glaze and hairline cracks in the glaze cannot be repaired professionally by oneself anyway. Chipped edges (as in the case of glass, they are also called "chips" here) could be treated with suitable fillers, finely sanded and then painted with porcelain paints. This work is certainly worthwhile in exposed places where such a chip really disturbs the visual appearance. After all, ceramic parts are painted in colour, so a chip will be seen more quickly here than on glass. But here, too, what I said about glass painting applies: Dilettantish and poorly executed work is always worse than the defect itself that is to be repaired or concealed.
Other repair work that I counted on glasses can also be done here. Ceramic parts that have been broken flat can be glued cleanly with a good porcelain glue. Unfortunately, the problem of small chipped glaze particles at the broken edges cannot be avoided with ceramics. Painting small areas where one colour has chipped off can also easily be done with porcelain paint. These paints are available at shops for artists' supplies and for hobby items. I was very lucky to meet a very experienced and skilled porcelain repairer near where we live (Mr Hubert Kühnel in Mannheim). Without his expert repairs, many beautiful porcelain or ceramic lamps would be missing from my collection. Try to track down addresses of "porcelain clinics" or "porcelain doctors" (as such repair services are also called) in your area. It is worth it.
Replacing and Recementing Font Collars or Brass Undermounts
You might be surprised that I describe this work on metal parts in this chapter for glass and ceramic work. The reason is that this work is directly related to replacing or fitting a glass font (see next article).
There are cases when one is forced to replace the collar or the brass undermount of a glass font. The first case occurs if the collar or the putty material used is damaged, or if the collar is a different size from the intended burner, or even if the thread type is not suitable. Despite the fairly advanced standardisation of thread sizes at that time, it sometimes happens that the intended burner does not fit into the thread of the collar, even though both have the same thread diameter. The second case with the brass undermount under the glass font occurs when the thread diameters of the undermount and the middle part of the lamp, where you want to mount this font, do not match either. In both cases, one has to dare a rather demanding sawing job and first cut off the collar or the brass undermount from the font.
With the Proxxon® cutting disc mentioned above, you must first try to saw the collar or brass undermount to be removed into 2-3 pieces if possible. This is much easier said than done. There is a danger that the rotating cutting disc will touch the adjacent glass of the font and leave ugly scratches. In this case, you should start by sawing through the parts of the metal that are furthest away from the glass, fairly perpendicular to the glass, but still keeping a distance of 4-5 mm from the edge of the glass. Then you should start the cut-off wheel again, but this time in a fairly oblique line to the previous, perpendicular cut. When there is only about 2-3 mm left to the edge of the glass, the cut-off wheel should be applied again, but this time really at a very slant, almost parallel to the edge of the glass and carefully cut through to the end without touching the glass. In this way you have made the first cut in a polygonal line. Now you have to repeat the same procedure at another place about 2-3 cm away from the first cut (this is true for collars; for undermounts maybe only 1 cm away). After these first two cuts, you can carefully remove the piece in between, as the putty does not adhere very well to the glass surface. The rest of the collar or undermount can then be removed completely with a little careful bending. If necessary, you can also make a third (or even a fourth) cut. Make sure that the metal is completely separated at the cuts.
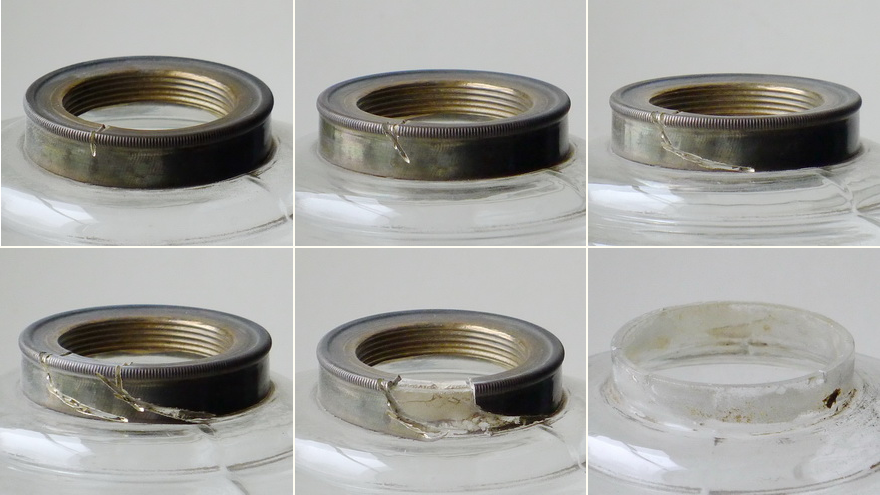
Separation of a collar from the glass font
Top row, from left: Upper part of the collar with the first vertical cut
Second, oblique cut
Third, very oblique cut, almost parallel to the glass
Bottom row, from left: the collar with two complete cuts
First collar segment cut off
Collar completely removed; now you can attach another collar to the font
Once the metal piece has been successfully cut off, the glass should be well cleaned of any remaining putty. Now you have to replaster the new collar or brass undermount in the same place. But for this you don't use window putty or even plaster, but a good, suitable two-component epoxy glue, such as is used nowadays for boat repairs. I tried the inexpensive polyester filler Yachtcare KK-Plast VT from the company Vosschemie right at the beginning, and since I was very satisfied with it, I have remained loyal to this brand ever since (but that doesn't mean that other, suitable products are any less good; test out for yourself what you like). To glue the new collar (or the new undermount) to the glass font, pour a sufficient amount of the already prepared filler quickly into the metal part and place it in the right place without wasting time. So much filler must be filled in that part of it swells out when the metal part is placed firmly in place. Only then is a permanently firm bond to the glass surface guaranteed. If possible, the main volume of filler that has come out should be removed immediately before it sets. This saves a lot of cleaning work later.
This filler I use sticks excellently, is not permeable to kerosene/paraffin, and after drying it can be sanded off easily. Its "pot life" (the time it takes for the filler to set) is relatively short, approx. 5-10 minutes, but allows for quick but careful correction of the parts to be glued. After this time, the filler is not yet completely dry, but it is no longer movable. Any forced correction after this time will destroy the adhesive properties. After one hour, the filler has finished reacting and is now completely solid, i.e. it can be properly loaded. Only now should any filler residue that has come out be removed. Removing and cleaning the filler is not very easy because the product adheres very firmly. Careful scraping of the thick adhesive residues that have emerged from the collar or undermount helps here, first with a sharp knife on the glass surfaces (for example with a carpet cutter), but not on brass surfaces (risk of scratching!) and then rubbing the remaining residues with steel wool. This type of filler or similar products can be found in well-stocked building supply stores, in the nautical or motor vehicle sector.
Attaching a Glass Font under a Metal or Majolica Lid
Here I will describe a demanding, unfortunately sometimes very necessary job. Almost all lamps of the Historicism period made of cast zinc, and also almost all majolica lamps of the Art Nouveau period are equipped with kerosene/paraffin tanks made of simple glass. These tanks were glued with a suitable adhesive (i.e. at that time with window putty or modified plaster) over a large area under the lid made of cast zinc or majolica. In some lamps offered on eBay or at flea markets, this glass font is broken and discarded. Sometimes this destruction was done deliberately in order to electrify the lamp. The glass tank would otherwise not allow the electric cable to pass through.
I bought lamps where the broken glass font had been replaced with a container that seemed suitable. A small glass cream jar, a sawn-off half of a wine bottle, a preserving jar or even a ceramic flower pot were among them. At least some effort had been made to carefully glue these replacement containers with plaster under the lid. A discerning collector must of course replace such hare-brained auxiliary constructions with real, old glass tanks. The problem is that such genuine glass tanks are no longer available. In all these years, I have rarely seen anyone offer such a glass font for sale. However, I have found a way out to remedy this situation. Very often, tops of such zinc cast or majolica lamps are offered, the bottom part of which has probably been lost. Of course, the glass font is included, because these halves are also offered as "lamps", as if they were complete. I buy such an offered "majolica lamp" and separate the glass font from the lid. Of course, I need to know to some extent whether this glass font fits into my lamp. This can be found out by asking the important measurements such as height and diameter before buying.
However, separating the lid from the glass font requires some skill in fine sawing. This is where the fine cut-off wheels from Proxxon® come in handy. In particular, the black fabric supported cutting discs are best suited for this work. First I cut the collar from thin brass sheet into 3-4 pieces and remove it from the lid. Then I very carefully saw off the ceramic part piece by piece, making several cuts on the surface, but without damaging the glass underneath. Patient, careful, cautious work is called for here. As long as the cutting wheel is sawing into the ceramic mass, a thick, white dust comes out. Sawing in this segment is slow. As soon as the cut-off wheel dips into the putty layer underneath, sawing suddenly becomes easier and faster. From here on, you only have to saw very carefully and very little further, if at all. If the cut-off wheel accidentally touches the glass surface, you will hear it immediately from the sawing noise. The majolica lid can thus be removed from the glass font piece by piece, because the adhesion of the old putty to the glass surface is not very strong. It is obvious that glass tanks with cast zinc lids are not suitable for this sawing work.
In the next photo, these steps are shown slightly differently, as here the majolica lid was inserted over the brass collar, making it impossible to simply remove the collar as the first step as described above.

Removing a majolica lid from the glass font
Top row, from left: Majolica lid still untouched
First cut through the collar
Complete first cut through the pottery
Bottom row, from left: Second complete cut through the pottery
The first ceramic segment removed; third complete cut made
The majolica lid completely removed; the font can now be attached under another majolica or metal lid
After finally separating the majolica lid, you can clean the glass font well and glue it in its new place with a good two-component epoxy glue. I also use the Yachtcare filler for this as described above. It can happen, of course, that despite careful consideration of the dimensions, a tank purchased in this way does not fit into the intended lamp vase. Then you have to try your luck again at another eBay offer. After all, several lamps in my collection have received a new, but genuinely antique glass tank in this way.
Repair of Broken Stone Edges
Every now and then you get a high-quality lamp with a stone base or stone column. Often marble, onyx marble, serpentine, alabaster, etc. were used to give the lamps a dignified appearance. Unfortunately, sometimes smaller and larger pieces have broken off at the edges of such stone elements. One can fill these damaged areas with a suitable putty material.
From time to time I had to carry out repair work on such broken-off stone edges. Instead of a classic filler, I used the two-component adhesive Pattex® Stabilit Express. This glue not only sticks very well, it is also well suited for small modelling jobs, because it is rock hard after drying and can be sanded and polished well. The problem is that the glue has a slightly reddish-beige colour after drying. Therefore, it is not suitable for very light-coloured stones (e.g. for white marble or alabaster).
If the stone used is black (or very dark, black-greenish) serpentine or marble, I have added very small amounts of finest carbon powder for painting purposes (available from Boesner GmbH) to the glue. For green onyx marble or other coloured stones, you can choose an appropriately coloured pigment powder.
First, fill the damaged area generously with Stabilit and let it dry thoroughly (1-2 hours is sufficient). Then you have to sand off the too much applied material layer by layer with flap sanders until you feel that the achieved shape is just right. Now you have to sand the rough surface very smooth with very fine sandpaper (600's sandpaper wetted with water) and then polish it with brass polish.
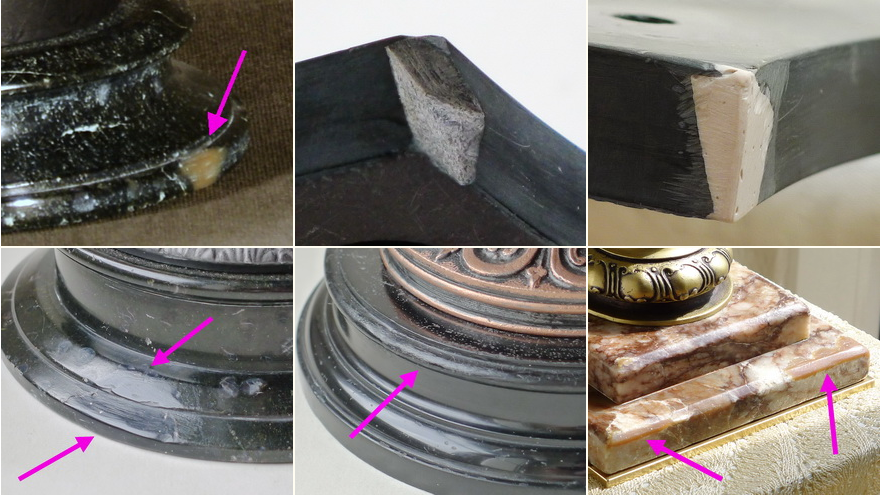
Some repaired stone edges
Top row, from left: Repaired edge of a black serpentine plinth (filling material in the colour not matched, as I got the idea with the pigment powders only later)
Broken edge of a slate plinth
Fracture edge of the plinth filled; not yet finished by sanding and polishing
Bottom row, from left: Repaired edge from a black serpentine plinth
Repaired edge from a black lacquered slate plinth
Repaired edge from a light red-brown banded marble plinth